Wednesday, December 14, 2011

Gift Swap and Other

My quilting guild had its Christmas party tonight.  We did a gift exchange.  Below is what I made.  I filled the pouch with a few small sewing items.  We had a lot of fun.


I also made this little basket tonight.  I'm not sure what I'm going to use it for, but I'm sure I'll find something.


I also have been meaning to make a money bag for a group that I'm in.  I found this fabric at Mill End and was so excited to use it for this project.


I sewed all weekend and have some photos, but it's almost 11pm.  So, I'll have to post them tomorrow.

Sunday, December 4, 2011

Reversible Bag #2

I have been experimenting with gift bags and came up with this one.  I'm going to put a tutorial up for it tomorrow.

 Side #1

Side #2

Reversible Reusable Gift Bag Tutorial


This tutorial is for all you other eco-friendly people out there who are looking for an alternative to wrapping paper.  These bags are a lot of fun to make.  They are completely reversible so you don't have the same prints from year to year.  I've made two sizes, medium and small.  I'll give the measurements for both sizes during the tutorial.  Enjoy!!


Materials:
1/2 yd. each of 2 coordinating fabrics
ribbon, cording, shoe laces, or anything else you can use for a drawstring.
Thread

Cut 2 pieces of fabric in whatever theme you like.  (I'm using mine for Christmas, but I also made some for birthdays.)  Medium Bag: 18x24 in.   Small: 12x20   Make sure you press your fabric before you cut it.


Put the fabric right sides together and sew all the way around (1.4 in. seam), leaving a 3in. opening at the bottom.


Once sewn, clip the corners.  Then, turn the bag right sides out.


Press the edge of the fabric.


When you get to the opening, fold the selvage in and press.


This will be sewn closed later.


Use your ruler to mark where to put your button holes.  You need to make 12 buttonholes.  (Medium Bag: 2 in. apart, starting 1 in. from the edge.  I marked mine 4 in. from the top of the bag.   Small Bag: 1 1/2 in. apart, starting 1 in. from the edge.  The small bag was marked 3 in. from the top of the bag.)


Sew each buttonhole.  The width of the buttonhole depends on how wide your ribbon or cording is.  On my medium bag they were 3/4 in.  On the small bag they were 1/2 in.


Fold the fabric in half, widthwise.


Sew along the side and bottom of the bag. Make sure you sew close to the edge (about 1/8 in.)

Cut buttonholes open and thread the cording through.  I started in the middle of the bag because that is where I wanted the bow.
Insert your gift.

Pull and tie the cording.  Then, enjoy!
Please let me know if you have any questions about this tutorial.

Tucker's Christmas Quilt

I just finished binding my nephew Tucker's quilt.  I didn't know that the binding would take over an hour to do.  LOL.

Saturday, December 3, 2011

Secret Santa Pouch

I am doing a Secret Santa gift swap with some other teachers at my school.  With my homemade Christmas this year, I've been researching and experimenting with fabric gift bags and pouches.  I came across this tutorial from A Spoonful of Sugar today and HAD to try it.  It was so easy.  It only took about 15 minutes!


 Open

 Top Closed

Bottom

Thursday, December 1, 2011

Homemade Christmas

I have decided to do a homemade Christmas this year.  It has been quite a challenge trying to complete everything.  Here are some pictures of projects I'm working on.

 I may keep this one for myself!


 I still have to finish the binding on this one.


 A quilt for my nephew.  (Front)

 (Back)


 These were the November project at the quilting guild.
You make them using a tape measure for the closure.

Quilting Guild Quilt

So, I know it has been a couple months since my last post.  There has been so much going on.  Moving, starting a new job, getting settled in, surviving the first quarter of the school year, etc.  I have been sewing.  It's just been a bit hard to post photos since my camera charger is STILL in Korea.  I borrowed the school camera to update you all.

I joined the local quilting guild.  It has been a lot of fun for me.  Last month we started on a large quilt project.  I can't remember the name right now, but I'll find it and post it later.  Here is a picture of what I have so far.  I have the last row sewn, I just haven't attached it yet.

Sunday, July 31, 2011

lessons in free motion quilting

My wonderful mother is letting my use her Viking Ruby sewing/embroidering machine.  It is a WHOLE lot different than the little Janome that I was using in Korea.  One thing that I really wanted to try was free motion quilting.  I had been reading and seeing a lot about it online and wanted to give it a try.  A few weeks ago I picked up some fall fabrics by Robert Kaufman (the Nutmeg Collection)  They Are just beautiful!  I decided to make a couple of table runners out of them, then quilt those.

#1

This is the first one I made.  For the quilting, I just went around each of the leaves.  This was a really quick project.  I still need to bind it.


#2

For this one, I went around each of the leaves and stars.  That looked ok, but I wanted to leaves to really pop.  So, I did some stippling (sp?) in the area between the leaves.  I REALLY like the effect.  Overall, this one is my favorite.  I am thinking about making some of these using winter fabric and giving them as Christmas gifts.

I'm not sure if you can see the details, I'll try to get a better picture soon.

New Quilt

Well hello blog readers!!  I know, it has been way too long since my last post.  I've had such a busy summer!  I have been sewing, but my camera charger was left in Korea, so I finally grabbed my mom's camera to show you what I have been working on.  First is my new queen size quilt.  It is the first big quilt I've done.  I decided to do a disappearing nine block pattern.  I finished the top earlier this week, and the back today.

 Top

Back

Wednesday, June 8, 2011

Sewing Withdraw

Well, I know I haven't posted in a while.  I wanted to drop a quick note to explain why.  Next week is my last week of the school year.  I'm also moving back to the States from South Korea.  So, I have been a busy girl packing everything and closing up my classroom.  I have been going through a HUGE sewing withdraw.  The movers come this weekend, so I'm hoping to have a little time to sew next week.  I am doing 2 mug rug swaps and have everything cut out for the first one.  I'm also going to make a neck pillow cover tutorial in the next few days.  So, stay tuned!!


I don't like to post without a picture, so I'm posting one of a project from a while back.  I made this as a birthday gift for a VERY special lady!!


Wednesday, May 25, 2011

Travel Case Tutorial


Here is the tutorial for the above travel case.  Feel free to share this tutorial.  Please link back to the original post.  I am trying to create a PDF for this, but my converter isn't cooperating.  I'll post it as soon as I can.


Materials:
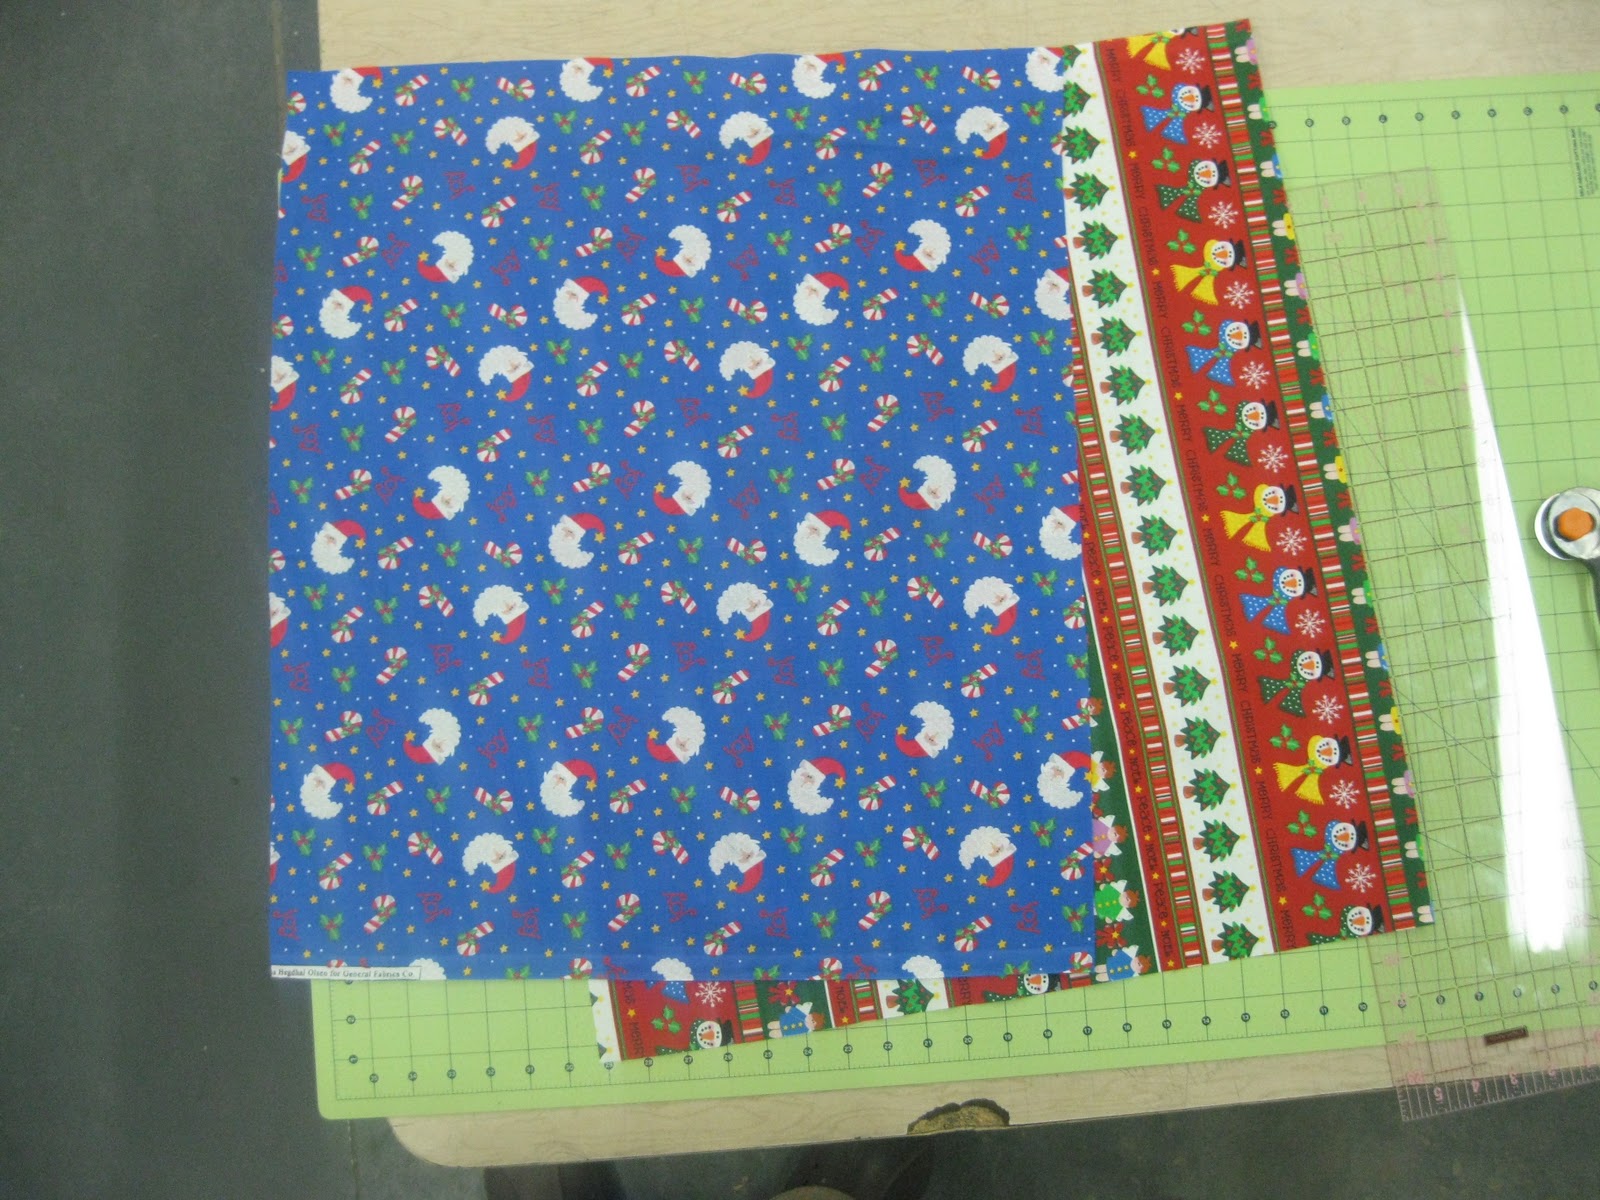
4 coordinating fat quarters or large scraps:
Fabric A- **Outside of the Bag (quilted-see note below)
Fabric B- Lining
Fabric C- Interior
Fabric D- Large Interior Pocket
Fabric E- Small Interior Pocket and Credit Card Pocket
¼ yard of fusible stabilizer (or scraps)
8x9 in piece of quilt batting
Two 8-9 in. zippers
Two ½ in. snaps

Cutting Your Fabric:
Note:
I trace around my patterns with a seam allowance disc made by Clover.  This adds a seam allowance of about 1/3 of an inch.  Please make sure to add a seam allowance of at least 1/3 in.   to each of your pieces.  You DO NOT need to add a seam allowance around the zipper tabs.

**All measurements are in inches**

Fabric A: four zipper tabs 1x3, 8x9 **I cut all my other pieces out first.  Then I use the remaining fabric to create a quilted front for the bag.

Fabric B: two 8x9 pieces, four zipper tabs 1x3

Fabric C: one 8x9 piece

Fabric D: one 8x12 piece

Fabric E: one 6x6 piece and one 4.5x8.5 piece (NO SEAM ALLOWANCE for 4.5x8.5)

Fusible Stabilizer: one each: 8x9, 6x8, and 3x6

Quilt Batting:  one 8x9 piece

Ironing and Quilting:
1. Once you have all your pieces cut out, you need to iron them.

2. Fold fabric E (6x6 piece) in half and iron seam.  Attach fusible stabilizer by lining up one of the long edges with the seam.  Press.

3. Fold fabric D in half, creating the large pocket (6x8 after folding) Attach stabilizer the same way as above.

4. Attach the stabilizer to fabric C by centering it on the back, then press.

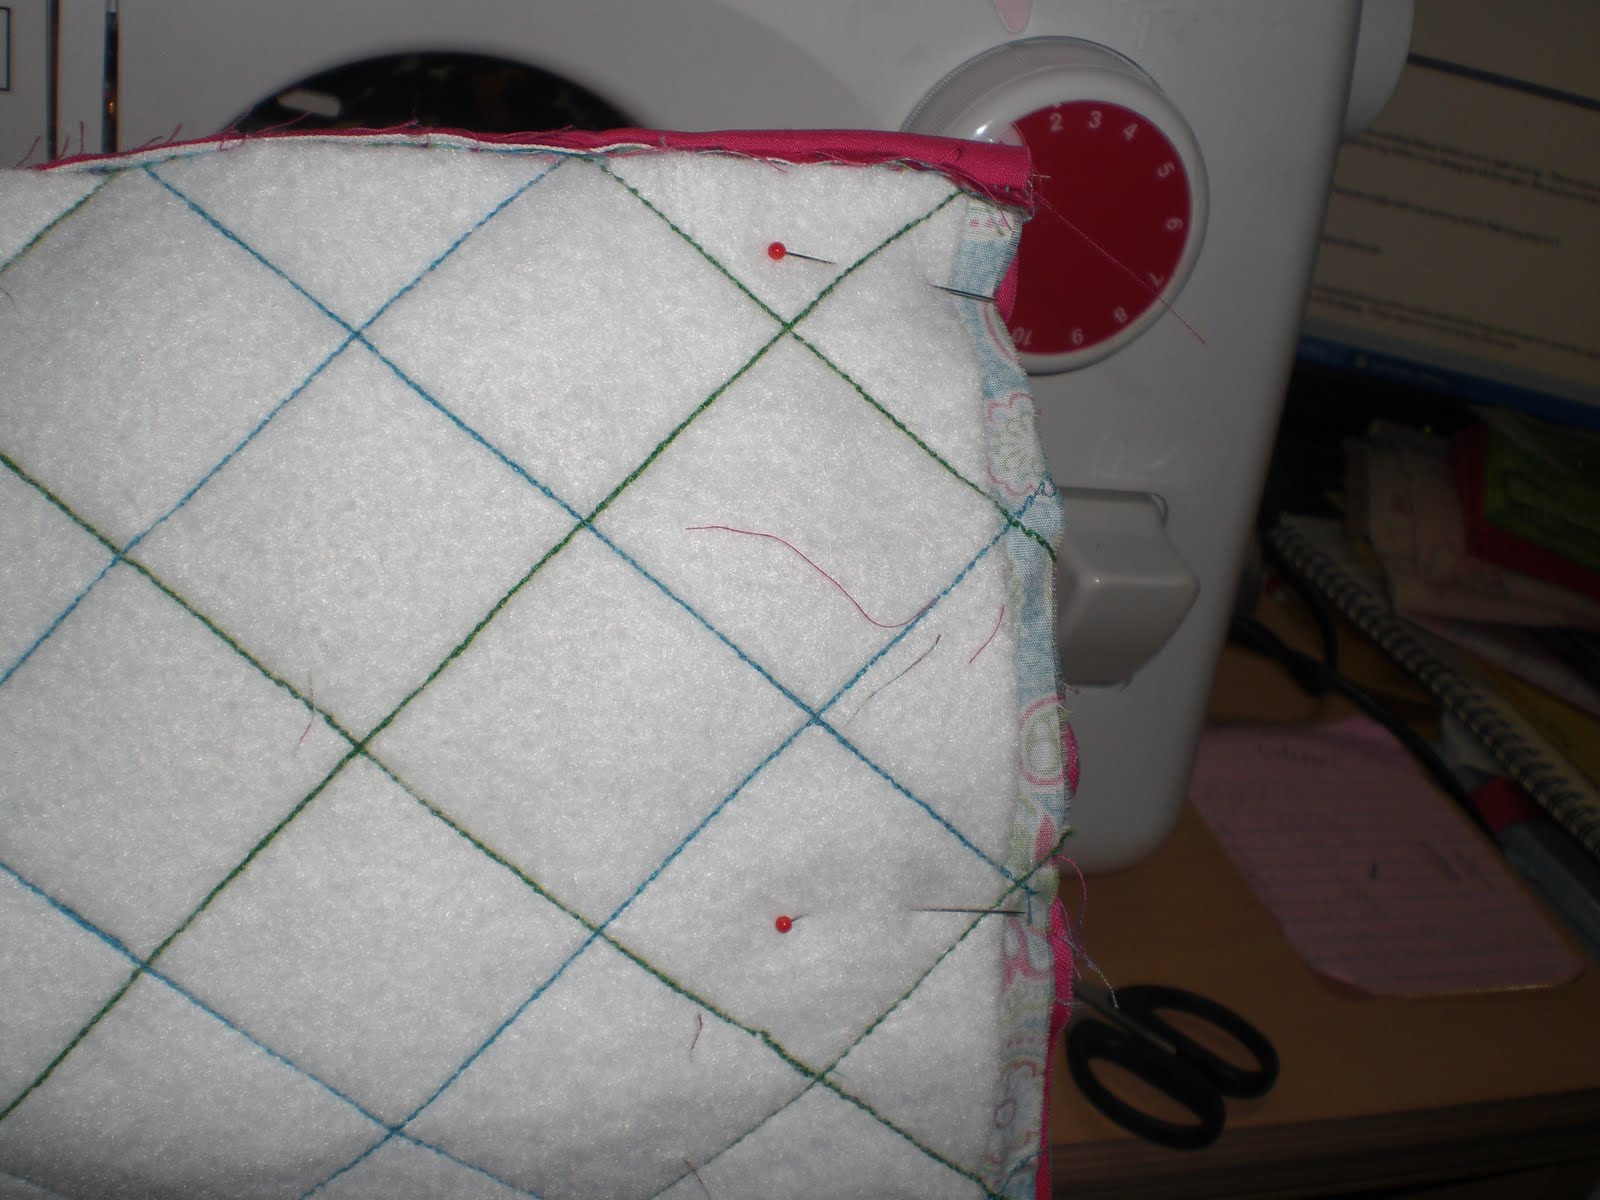
5. Quilt the top of fabric A in any design you choose.  Just make sure that your finished piece is at least 8 2/3x9 2/3 (this includes a 1/3 in. seam allowance)


Directions:
Interior:
1.      Take fabric E for the small pocket.  Fold in half, right sides together.  Sew one of the short seams.

2.      Trim the corner and flip right side out.
 
3.      Fold fabric D in half to make the 6x8 in. pocket.  Pin the newly sewn edge of the small pocket to fabric D.  Top stitch along edge.


4.      Pin the pocket piece to the interior fabric on the three outer edges.  Baste along the outer edges.  **Make sure your stitches are close to the edge.
 
 
Credit Card Pocket:
5.      Now for the credit card/id pocket.  Take your other piece of fabric E.  Fold and press ¼ in. around all sides.

6.      Starting at one end, mark 2 in, 1.5 in, 2 in, 1.5 in, and you should have about an inch left over.


7.      Fold and iron along your markings.

 
8.      Using the long edge of one of your lining pieces (fabric B) mark 1.5 in. from the top edge and the center.  Mark the center of the 1 in. fold of your ID pocket.

9.      Line up the top edge of your ID pocket (the 1 in. side)  When it’s lined up, open the seam allowance and pin.


10.      Sew along the fold.

 
11.      Flip the pocket so it folds neatly and pin along the sides and bottom.

 
12.      Sew along the sides and bottom.  Remember to backstitch at the beginning and end of the seam.


Zippers:
13.   Fold each zipper tab down 1/3 in.  Pin fabric A to the front of the zipper and the lining fabric to the back of the zipper.  They should be pinned just above the zipper stops.


14.      With your needle set to center, start sewing just above the fold.  I sew to the end of the zipper (about 1.25 in.)  Do this on both sides of the zipper at both ends.

 
15.      Next, you’re ready to make a little sandwich.  First, lay down your lining fabric, right side up.  Then center your zipper, right side up, along the 9 in. edge.  Next, place fabric A, right side down, on top of the sandwich.  Make sure the edge of the fabric line up with the edge of the zipper.  Trim any excess zipper tab fabric away.

 
16.      For this step you can use a zipper foot.  I don’t have one.  So here is what I do.  Set your needle to left of center.  Sew along the edge of the fabric making sure the zipper is right next to the presser foot.  Make sure to backstitch at the beginning and end of the seam.

 
17.      Flip the fabric so the zipper is on one side, and the fabric (wrong sides together) is on the other.  Top stitch along the seam you just created.

 
18.      To sew the other side, lay down the other piece of lining fabric, right side up.  Next, place the piece you just finished sewing, zipper side up.  Last, place fabric C (interior fabric with pockets attached) face down.  Line up the edges.   Pin.  Complete step #17 and #18 for this side of the zipper.
  
19.      Lay your piece out flat, with the lining fabric on the bottom and the exterior/interior up.


20.      Roll one side in toward the zipper.  Pin to keep it out of the way.

 
21.      Flip the existing lining fabric so it is right side up.  Place other zipper, right side up along the edge of the lining.  Then, fold the top fabric over, lining up all the edges.
 
22.      Pin and sew following step #17.

 
23.      Turn piece right side out and top stitch following step #18.
 
24.      Unpin rolled side.  Flip fabric so the lining piece is right side up.  Line up the unsewn side of the zipper with the edge of the lining fabric.  Lastly, flip the outer fabric piece.  Line up all the edges, pin, and sew.

 
25.      To complete the top stitch on this side of the bag, flip the bag to create a tube with the lining on the inside.  Make sure to open the zippers, and keep an eye on the lining so you don’t sew it into the seam.  Carefully top stitch following step #18.
           
 Finishing:
26.      You will now have a tube, with the right sides out.


27.      You need to turn one of the sides so that the fabric is wrong sides out.

 
28.      Pin lining fabrics and outer fabrics together along the edge.


29.      When you get to the zipper tabs, fold them in half, right sides together.  This will create a nice finished corner.

30.   Sew around one entire side of the fabric.


31.      Before sewing the other side, ****OPEN BOTH ZIPPERS!!!****  Mark a 3 in. opening on the lining side of the fabric.  Do not sew here.

32.      Sew from one mark, around to the other.  Make sure to backstitch at the beginning and end of the seam.

33.      CAREFULLY turn the bag right side out.

 
34.      Turn the bag so the lining fabric is on the outside.  Hand or machine sew the opening in the lining closed.


35.      Turn the bag right side out.  On the outer fabric of your case, mark a line down the center.  Pin along the line.
 
36.      Sew along this line, going through all the layers of fabric.

 
37.      Lastly, sew on some snaps to keep your case closed.  Sew them on each side of the small pocket.  I know this seems strange, but if you sew them on the corner of fabric C you can’t fit your boarding pass in the pocket and snap it closed.


Whew, that's a long tutorial.  It really doesn't take that long to make once you get the hang of it.  If you have any questions, please feel free to ask.  Also remember, I LOVE comments!  Happy travels!!